Most water gardeners are aware of the importance that good quality water plays in a pond habitat. Not knowing how to get or keep water quality can sometimes prove challenging. Your water may be clear, but your fish might be acting differently, which can signify that something might be a little off in your pond’s water.
With a little education and experience, you’ll become better equipped to solve whatever pond water issues you might have. For starters, follow our 7 tips below to help keep your pond water clean!
1. Maintain a healthy fish population
If you have more than 10” of fish for every 100 gallons of water, your pond is likely over-populated. Excessive fish waste can cause an imbalance in pond water. Consider finding some of them a new home. Many pond retailers and contractors will accept your fish.
2. Don’t over-feed your fish
When you feed fish more than they can eat, the uneaten food is left to decay in the pond. Be careful not to feed your fish more than once per day, and no more than they can eat in 2 to 3 minutes. Choose a quality fish food – preferably one that floats as opposed to sinking to the bottom of the pond if left uneaten.
3. Create a proper balance of plants
At season’s peak, you should have 40% to 60% of the surface area of your pond either covered or shaded by plants. Too many plants can cause oxygen deficiencies at night due to the photosynthetic process, when the plants take in oxygen and give off carbon dioxide. Your fish need the oxygen to survive (see tip #7).
4. Choose the right size pump for your pond
You should be circulating the entire pond’s water volume a minimum of once every hour. Make sure your pump’s flow isn’t restricted by debris in the skimmer or biological filter, and be careful not to pump water higher than it was intended. Every pump has its flow limitations. We’ve made it easy for you to choose the correct size pump for your pond and waterfall with our online pump selection guide.
5. Clean debris from pond before it has a chance to decay
Your pond skimmer will remove most of the debris from the surface of your pond, but you can also use a pond net to skim leaves and small sticks before they have a chance to descend to the pond’s bottom where they’ll decay. Decaying debris, combined with fish waste and leftover fish food, can cause ammonia levels to spike in your pond.
Ammonia can be harmful to your fish and should be addressed right away. If you see your fish jumping out of the water, you likely have an ammonia spike which can happen after adding an algae treatment. You can purchase an ammonia test kit at your local pet and aquarium store and if you find the levels are high, simply treat your pond water with Ammonia Neutralizer. Beneficial microbes such as Aquascape Beneficial Bacteria helps keep your pond water healthy and clean for your finned friends. Better yet, install an Automatic Dosing System to electronically dispense beneficial bacteria and other treatments to your pond to help with breaking down debris and maintaining a proper nitrogen cycle.
6. Choose proper filtration for your pond
Just like your pond pump, your pond’s filter should match the size of your water garden. Most pond filters are based on ideal circumstances, and if you exceed those, your filter becomes less effective. Always up-size your filter so that it can handle more than the capacity of your pond and remember to clean your filter according to instructions.
There are two types of filters in an Aquascape ecosystem pond. A mechanical filter, also known as the skimmer, removes surface debris from your pond water such as leaves and small sticks. The biological filter, or BioFalls filter, is positioned to create the beginning of the waterfall in your pond. This filter uses bacteria to break down pond wastes, converting them into less harmful compounds that can be absorbed as fertilizer by your aquatic plants.
7. Keep your pond cool during the dog days of summer
When pond water exceeds 75º Fahrenheit, it has a difficult time retaining acceptable levels of dissolved oxygen, which is critical for the health of your fish. This is why it’s important to have the surface of your pond shaded by aquatic plants (see tip #3) – to help keep pond water cool. Fish need oxygen to survive. If you see them at the pond’s surface gasping for air, add an aerator to help them during times of extreme heat.
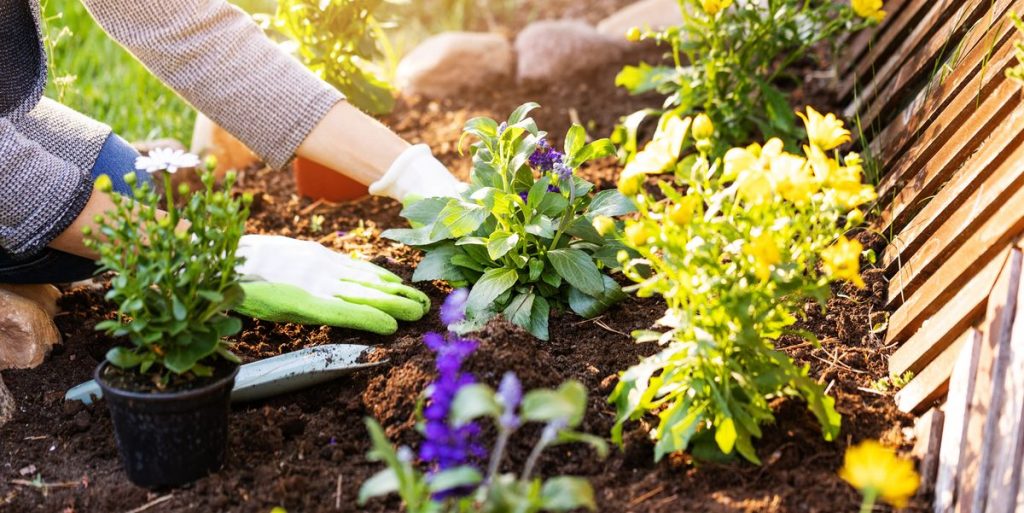
There are several levels of butterfly gardening depending on whether you want to just attract a few or provide a habitat inviting several varieties to move in lock, stock, and chrysalis. You can start by planting a few nectar plants or providing other lures to attract the butterflies in your area. You may find that you’re satisfied or that you’re so enchanted by your fluttering visitors that you want to do more.
Butterfly habitat necessities
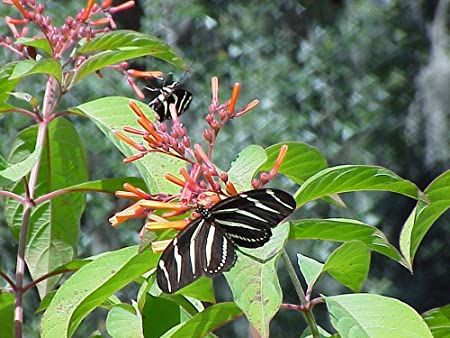
Adult food sources In the garden, these are most often plants that provide nectar for adult butterflies. Most butterflies aren’t very picky and will feed on a variety of flowering plants, though they may have a favorite or two. Fermenting fruit also makes a good food source.
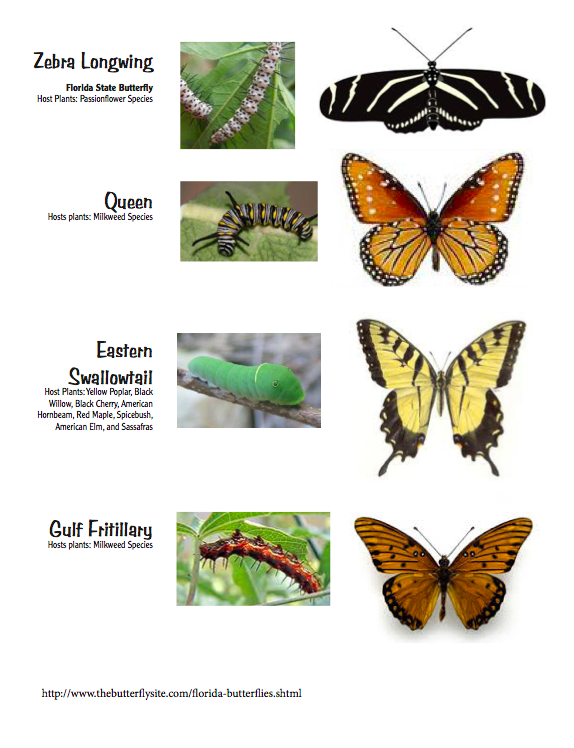
Host plants Plants that provide a site for the butterfly to lay eggs and a food source for the emerging caterpillar. Be prepared for heavy munching on host plants. Since highly preferred hosts may be unattractive or eaten until they have few leaves, mix in with other plants.
Shelter Woody plants located near the nectar plants will provide butterflies with shelter during bad weather and at night.
Water Butterflies can’t drink from open water. They prefer very wet sand or soil.
Planning a successful butterfly garden
Butterfly species Determine which species live in your area and which ones you want to attract. Several walks around your neighborhood will help you determine which butterflies are in the area and what they’re feeding on.
Select a site Choose a site for your butterfly garden that receives full sun, defined as six or more hours of direct sunlight daily. A little bit of late afternoon shade is fine, but most butterfly garden plants need bright sunlight. If you’re adding plants to an existing bed, try to cluster butterfly-attracting plants together. This provides a variety of places for butterflies to feed. If you’re creating a new garden, select a spot that’s easy to see from a porch, deck, or window so you can enjoy the bright colors and antics of visiting butterflies. Group plants together in clusters of three or other odd numbers. This looks more natural from a distance. Clustering flowers together by color, such as all red or orange blossoms together also forms a more cohesive look. Avoid the use of broad-spectrum insecticides, especially Bacillus thuringensis (BT), or any insecticide that is applied broadly in the environment.
Decide on the type of garden Select plants suited to the selected butterfly species and that will fit in with the type of garden you’d like to have whether it be formal or natural or somewhere in between. You can even have a butterfly rock garden. If you have an area that gradually slopes to the south, it’s an ideal spot for a butterfly rock garden. Include flat stones and low-growing butterfly plants, such as lantana, Stoke’s aster, and clover.
Adult food plants Find out more about the native nectar plants that will attract the butterflies in your area. Butterflies are attracted by sweet-, pungent- and acrid-smelling flowers that are orange, yellow, pink, purple and red.
Other attractions Sugaring* may be just the entree for your neighborhood butterflies or perhaps a nectar feeder. You might also consider providing a “puddle” or an area for basking. Some butterflies sip moisture and nutrients from moist soil. You can provide a puddle by allowing water to stand in a depression in your yard or by placing sand in a wide shallow container and keeping it moist. Puddles should be in an open area. Butterflies also bask in the sun to raise their body temperatures so they can fly. You can accommodate them by including some flat rocks in your garden. A few extra-large rocks provide more perching and sunning spots for butterflies.
Host plants Find out more about the host plants that butterflies will lay eggs on and that will feed the caterpillars. Host plants aren’t just maternity wards. Many butterflies are more likely to frequent nectar plants that are near host plants and may feed on the host plants, too.
*Sugaring Sugaring involves combining one can of beer, a pound of sugar, a half cup of dark molasses and some very ripe fruit in a blender and allowing the mixture to thicken to a spreadable consistency. After letting the tantalizing elixir ferment for about a day, you brush it onto tree trunks or posts or place it in a dish on a flat surface and then wait for the butterflies to arrive.
Butterfly Plants
Flowers
Aster Bee balm Black-Eyed Susan Buddleia Butterfly bush Cannas Catmint Coreopsis Daylily False indigo Gaillardia Goldenrod Guara Hollyhock Joe Pye Weed Lantana
Curb appeal comes in many different forms, and it can greatly improve your ability to sell your home quickly and for a great price. Even if you’re not thinking about selling just yet, it’s a good idea to consider your landscaping and other outdoor aesthetics, as they can significantly raise your home’s value. The lawn and garden are the main factors to address, but you can also paint your front door, replace your mailbox, or add some color to your porch.
It’s a good idea to think about how you can easily maintain your lawn area and how to take preventative steps to keep the front of your home looking great. This might include sealing a wooden porch against the elements or ensuring the gutters are sturdy and clean. There are lots of things to think about, so take it one step at a time in order to prevent becoming overwhelmed.
Here are a few tips on how to get started when you need to add curb appeal to your home.
Hire a Professional
Do you hate gardening with a passion? No problem. You can find a great gardening service in your area that will help you control weeds, plan out an easy-to-maintain landscape, and/or keep bushes and trees looking beautiful without wrecking your budget. A professional gardening service can also help you keep your lawn looking great all year round, which is essential for homeowners who live in parts of the country with unforgiving winters or harsh summers.
Repaint
Painting your front door, porch, columns, shutters, fence, mailbox, or garage door can liven things up a bit and give your home a pop of color without breaking the bank. There are a few different ways you can go about it; some people like to use spray paint because it allows them to control the area a bit more. But depending on the material, you can also use a paintbrush. Make sure you wipe down the surface carefully before applying paint, cover up any hardware with tape, and wait for the right time; for most of these projects, the weather will need to be just right.
Embrace the Details
There are many little things you can do to boost your home’s curb appeal, and focusing on these details rather than going big will help you save money. Update your welcome mat, replace lighting fixtures, add small flower pots to the porch, or add a new wreath to the front door. You can also find seasonal flags to hang that will offer a bit of color to the front of your home. Just be sure not to go overboard, as too much can be just as bad as not enough. Keep things symmetrical when possible, unify the color scheme, and make sure the lawn and porch are tidy.
Fix Up the Siding and Gutters
Especially important if you’re going to be selling your home, fixing up the roof, siding, and gutters can definitely help the house stand out. These things can be affected by the weather, trees, and extreme temperatures, and they can deteriorate even in just a year’s time, making it crucial for you to stay on top of them. Also, ensuring that there are no cracks, broken parts, debris, leaves, or mold can go a long way toward creating a better aesthetic for your home.
Boosting your home’s curb appeal doesn’t have to be a stressful job that costs a lot of money. With a bit of creativity, you can make some changes that will take your house to the next level and add to its value without spending money that you could be using for something
For those of us who keep our dogs in the backyard, we know it can be a challenge to keep them entertained back there. There aren’t many doggy toys that can survive the test of time, and aside from chew toys or rawhide bones, it can be difficult to come up with new ideas for keeping them entertained. Thankfully, there are a handful of backyard design ideas that a dog lover such as yourself can use to keep your pups happy. In case you’ve got some furry friends in your backyard, here are some of the best design ideas that they’re guaranteed to love.
1. Add Some Shade Most dogs have a lot of fur, so even in mildly warm temperatures, they can get uncomfortably hot. For this reason, all dogs love to relax in the shade. There are a few ways you can add some shade to your backyard, from putting up a small doggy tent to building a porch with a durable patio ceiling. Another option that many homeowners prefer is planting a beautiful tree that blends in naturally to your landscaping. Remember that plants native to your area will be the most steadfast and durable, requiring less upkeep. For any and all plant additions to your yard, be sure that they are not harmful or dangerous to your pet.
2. Build a Deck Adding a deck to your backyard provides some variety, and your dogs will enjoy the opportunity to hide their bones in a new spot. You can’t just build any old deck for your dogs though, it has to be especially durable to handle wear and tear. Depending on the size of your backyard and your dogs, you’ll need to do some calculations with a deck building calculator before you begin.
3. Add a Water Feature The only thing most dogs love more than shade is water. Adding a shallow pool, pond, or fountain for them to wade in will provide endless entertainment and just one more thing to occupy their minds. Alternatively, a pondless waterfall could be another great way to cool off your pup. You’ll want to include some paving, preferably of the permeable variety, around your pool. This will allow the spill-over from the pool to neatly drain away through the paving without causing mudholes and messy ruts.
4. Upgrade Your Fencing Fencing is important to have if you own dogs. Unless they are house-trained, most dogs will wander off if they aren’t fenced in. A good fence allows them to roam free while keeping them on your property. Depending on your preferences, surroundings, and the disposition of your dogs, you can either go with solid fencing or see-through fencing. You might also want to lay down some solid footboard around the edges of your fence so your dogs can’t dig under it. Trust me, they’ll try.
It’s Not Hard to Keep Your Dogs Happy A backyard can get boring fast for dogs. That’s why you should spice yours up with one or two of the ideas we’ve laid out in this article. From fencing to a shallow pool, a deck, and some shade, all of these ideas are sure to please your dogs and keep their tails wagging for the foreseeable future. You could even implement all of them and create a paradise that any dog would envy, it’s up to you.
Jordan Swift is a contributor to Innovative Building Materials. He is a blogger and a content writer for the building materials industry with an interest in landscaping and outdoor remodeling. Jordan is focused on educating homeowners, contractors, and architects on innovative materials and methods of construction that increase property value, improve sustainability, and create a warm and welcoming ambiance.
We all know mulch serves as a decorative landscape accent and weed block during the growing season. But did you know that mulch is also beneficial in the landscape to protect Florida plants from the freezing temperatures of Winter?
In addition to looking great the purpose of Winter Mulching is primarily to protect your plant’s root systems from exposure during freezing temperatures. Picking the proper mulch for your winter mulching needs and using appropriately is key to maintaining healthy plants in your Florida landscape.
The products we recommend for winter mulching:
Pine straw – a good lightweight mulch choice for flower and vegetable beds and around shrubs. Pine Bark chips – Decomposes slowly and is available in chipped and shredded form. Avoid those made from pressure-treated wood. Cypress mulch – Used year-round particularly as decorative border material in flowerbeds. Cypress mulch should be rotated out of beds every few years due to excessive compacting and fungus buildup.
You may also use raked up leaves from various trees as mulch material, which is a good alternative with composting value, returning nutrients into the soil.
When applying mulch around trees and shrubs leave a mulch-free zone of a few inches around the trunks. For winterizing mulch we recommend to use up to six inches of pine straw and 2-4 inches for the heavier, more compactable pine barks and cypress mulches.
Don’t Forget: Many of our non-native plants such as tropicals require foliage to be protected from frost by using frost cloth or bringing potted plants indoors. Potted plants likewise require special attention as the soil in the pot can be at greater risk of freezing than if planted in the ground.
One More TIP: Over mulching around deciduous plants (those that drop leaves seasonally) may concentrate too much warmth and trigger a break in their dormancy cycle stimulating new growth that becomes stressed with ongoing cold weather.
When it comes to our lawns all the rain we’ve been experiencing here in Northeast Florida has its pros and cons. First the good news, the regular rains have provided relief keeping the oppressive heat from drying out our grass and thus keeping the chinch bugs at bay. The bad news, persistent moist lawns have invited in the tropical sod webworms (Herpetogramma phaeopteralis Guenée)! They arrived early and have been wreaking havoc on our lawns for the last four months! There are several other species of webworms that also cause damage, but the tropical varieties have become a prevalent threat to the Northeast Florida lawns this year. The dingy gray triangular-shaped moths fluttering up from our feet while walking through the sod is the most obvious clue you have a problem requiring your immediate attention. While we cannot prevent them from flying in from neighboring lawns we should be looking and listening for their caterpillar larval stage feasting on the sod at night.
Unlike chinch bugs that eat the entire plant the sod webworms feast only on the sod leaf blades, but unchecked can do tremendous damage leaving behind large brown patches during infestations. Furthermore, don’t make the mistake of thinking winter cold will take care of the problem it may not be cold enough and the health of the untreated sod may be worse come Spring.
Treatments include Bacillus thuringiensis, a beneficial bacterium sold under several brands at Earth Works Garden Center. Homeowners may also choose the parathyroid insecticide bifenthrin either as a liquid or in combination with fertilizers such as Scotts Summerguard Lawn Food with Insect Control
For help addressing your specific lawn and lawn pest control needs to contact me Chad Lakin for a FREE Lawn Maintenance & Lawn Pest Control Quote: 996-0712
Earth Works designs, constructs, and provides support for people wanting water features of all sorts including patio-bowls, pondless waterfalls, water gardens, koi ponds, and recreation ponds. With weather events such as tropical storms and hurricanes, all these water bodies require specific care and attention before, during, and after the storms.
Fishless Water features: The biggest concern besides direct damage to a patio-bowl or pondless waterfall may be the standing water-attracting mosquitos after several days without electricity. • A simple solution is the mosquito dunks and bits available at large retail stores that will prevent mosquito breeding in these systems.
For ponds with fish: Water gardens, koi ponds, and recreation ponds have a more extensive set of concerns to keep those ecosystems and fish healthy in the event of storms and power outages.
• Reduce or stop feeding the fish several days before the storm to reduce their toxic ammonia output into the pond. • Go ahead and do any regularly scheduled water changes along with checking the filtration system, cleaning skimmer baskets, etc. • Assess the threat of pond water overflows and if that were to occur would it result in additional flooding issues or allow fish to escape? Might other hazardous materials enter the pond in flooding conditions? Sandbags could be useful. • Some pond owners will remove the fish and hold in a protected area to weather the storm. • If the threat of flying debris into the pond is significant netting or even sheets of plywood could be used for protection but must be safely secured.
• As filtration and oxygenation are critical for fish health backup generators are literally lifesavers! Battery-powered pond aerators are a quick, easy and inexpensive resource for situations where power may be out for only a few hours. • API 5 in 1 Pond Test Strips are invaluable for monitoring the critical pond water chemical parameters that affect fish health. We regularly stock these at our garden center. SEE OUR YOUTUBE VIDEO DEMONSTRATING USE:
• Be aware that the greater the number of fish and larger they are the greater their oxygen requirements and output of toxic ammonia into the pond. • EarthWorks carries a full-line of Aquascape Inc. products to keep your fish and pond healthy regardless of the critical situation they face.
Silverleaf Whiteflies are not actually flies but distant relatives of aphids and leafhoppers. And like aphids, whiteflies feed on plant sap and produce a sugary waste product called honeydew. Whiteflies cause damage in a variety of ways by eating the plant, as a result of their sugary excretions, and by spreading viruses. The most common genus and species were Bemisia Tabaci believed to have originated in India or the Middle East and identified in the United States dating back to 1896. In the 1980s another biotype, Bemisia Argentifolii began attacking Florida farms, poinsettias, tomatoes, and other fruits and vegetables. Within five years this biotype had spread to Texas and California costing over a billion dollars in agricultural loss.
Scientists have found a variety of effective biological and chemical controls along with cultural practice recommendations for reducing the threat of whiteflies. A couple of options we stock at Earth Works are either a broad spectrum or systemic insecticide from Ferti•lome.
Whiteflies once considered a minor pest have become a major problem for agriculture and may pop up in your garden.
For help addressing your specific lawn and lawn pest control needs contact Chad Lakin, Lawn Maintenance & Lawn Pest Control operations manager for a FREE Lawn Maintenance & Lawn Pest Control Quote: 904-996-0712.
Better Than Your Grandma’s Herb Box – The perfect herb box for any back porch, patio, green house or gift.
Time: 45 minutes
Servings: 1 Serving
Ingredients For the Container:
• 1 – 29 x 14 x 14” Planter Box
For the Planting Media:
• 1 – .5 c.f. Bag of Pea Gravel
• 1 – 2 c.f. Bag of Happy Frog Potting Soil
For the Plants:
• 1 – 10” Lavender
• 1 – 1 gal Pesto Basil
• 1 – 1 gal Creeping Rosemary
• 1 – 1 gal Blue Tuscan Rosemary
• 1 – 4” Blue African Basil
• 1 – 4” Genovese Basil
• 1 – 4” Dill
• 2 – 4” Sage
• 2 – 4” French Cooking Thyme
Instructions
1. Place planter box on flat surface that is easy to access.
2. Open bag of pea gravel and dump into the bottom of your planter box. This should give you about two inches of gravel which helps with the drainage.
3. Next, open your bag of Happy Frog potting soil and pour it into your container until half full.
4.Once your soil is in, take your biggest plant, the lavender, and figure out exactly where you want it. Since this is your biggest plant you might want to put it toward the back so it doesn’t overshadow some of your smaller plants. You might need to move some soil over to make sure the top of your plant’s soil is an inch or two from the top of your container. Remove the lavender from its plastic pot and loosen the roots, then place it in your planter box.
5.Now add in some more soil and build up around your plant till you can add your 1- gal plants without them being too low. Then take you 1 gal plants, place them where you want them and again make sure the top of their soil is an inch or two from the top. I recommend putting your creeping rosemary in the front of your pot or to the side so that it can fall to the side and create a nice cascading effect.
6.Repeat step 5 but this time raise your soil enough to be able to place your 4” plants. Again, I placed my thyme in front so it can grow over the side of the pot.
7.Lastly, you are going to fill in all the crevices in the container that don’t have dirt. Take a small plastic pot or use your hand to put soil in these areas and then pat it down with your hand. You can also water your pot now which will pull your soil down and show you any places you might have missed soil.
8.Your planter is now complete and ready to be enjoyed by you or anyone else who loves fresh herbs.
Share Your Story!
Manage Consent
To provide the best experiences, we use technologies like cookies to store and/or access device information. Consenting to these technologies will allow us to process data such as browsing behavior or unique IDs on this site. Not consenting or withdrawing consent, may adversely affect certain features and functions.
Functional
Always active
The technical storage or access is strictly necessary for the legitimate purpose of enabling the use of a specific service explicitly requested by the subscriber or user, or for the sole purpose of carrying out the transmission of a communication over an electronic communications network.
Preferences
The technical storage or access is necessary for the legitimate purpose of storing preferences that are not requested by the subscriber or user.
Statistics
The technical storage or access that is used exclusively for statistical purposes.The technical storage or access that is used exclusively for anonymous statistical purposes. Without a subpoena, voluntary compliance on the part of your Internet Service Provider, or additional records from a third party, information stored or retrieved for this purpose alone cannot usually be used to identify you.
Marketing
The technical storage or access is required to create user profiles to send advertising, or to track the user on a website or across several websites for similar marketing purposes.